【解析屋さんのためのExcelVBA(番外編)】PowerPointVBAで指定フォルダ内の画像を整列して並べる
Category:ComputerScience
Tags:PowerPoint, VBA, Windows

はやし@color_chipsです。
Excelネタも早くも尽きてきました。
そこで、今回はPowerPointに注目!なんと、PowerPointでもVBAできます。
PowerPointでVBA
VBAは何もExcelだけの特権ではありません。
PowerPointでもWordでもマクロは組めます。
最近は報告書等々をPowerPointで書くことが多いです。
報告書はWordで書け!と言われるかもしれません。邪道なのかも知れませんが、案外と多いんじゃないでしょうか?PowerPointで報告書書いている人。
そしてまたデジカメ等の普及によりそういった書類に簡単に写真を貼り付けることが当たり前に出来るようになりました。
わかりやすい報告書、レポートには欠かせない画像データですが、これが大量になると貼り付けるのもめんどくさい。
なので現代文明の力、VBAの力を借りて自動でやってしまおうというわけです。
PowerPointでVBAの手始め
※PowerPoint2010での設定です。
『開発』タブを表示する。
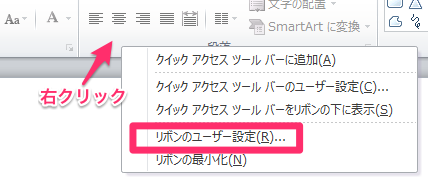
1.メニューの何処かで右クリックし、『リボンのユーザ設定』をクリック
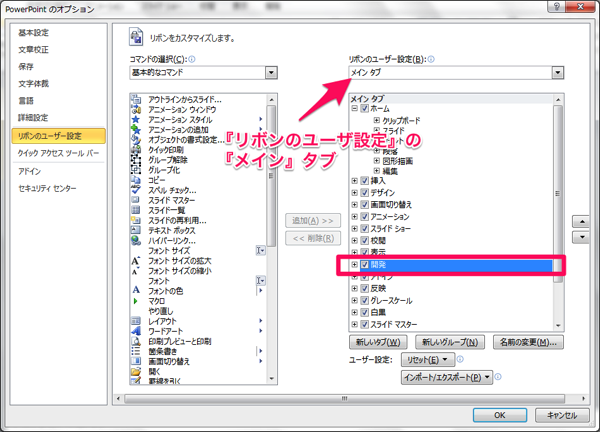
2.メインのタブで、『開発』にチェックが入っているか確認する。入っていなければ、入れる。
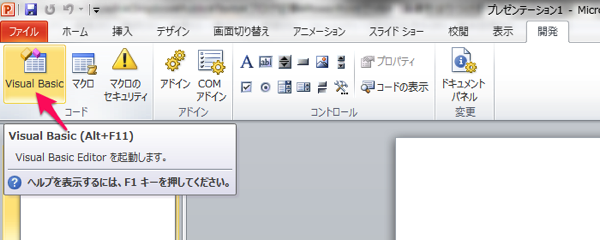
VisualBasic開発画面を表示し、コーディング準備をする。
『開発』タブの一番左のメニュー『VisualBasic』をクリックすると、別ウインドウで開発画面が表示されます。
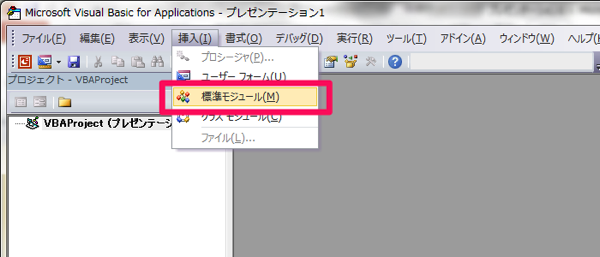
そこで、『挿入』メニューから『標準モジュール』を追加する。
これで準備完了です。存分にコーディングしてください!
画像を整列して並べるマクロ
さて、本題の。
(2014/8/7 ソースコード修正しました。)
Option Explicit
'//[[[[[[[[[[[[[[[[[[[[[[[[[[[[[[[[[[[[]]]]]]]]]]]]]]]]]]]]]]]]]]]]]]]]]]]]
'//[[ Function   : 現在のスライドへ画像をタイル状に貼り付け              ]]
'//[[[[[[[[[[[[[[[[[[[[[[[[[[[[[[[[[[[[]]]]]]]]]]]]]]]]]]]]]]]]]]]]]]]]]]]]
Sub addPhotoTilingSlide()
    '//[[[[[[[[[[[[[[[[]]]]]]]]]]]]]]]]
    '//[[ 変数定義 ]]
    '//[[[[[[[[[[[[[[[[]]]]]]]]]]]]]]]]
    Dim i As Integer
    ' ファイル操作
    Dim szPath As String
    Dim objFileSystem As Object
    Dim objFolder As Object
    Dim objFile As Object
    ' スライドのサイズ
    Dim iSlideWidth As Integer
    Dim iSlideHeight As Integer
    ' 貼り付ける画像のサイズ
    Dim iImageWidth As Integer
    Dim iImageHeight As Integer
    ' 画像オブジェクト
    Dim stImageShape As Shape
    ' 画像データの横に並べる数
    Dim iImageColumnCount As Integer
    ' 画像データ配置時の隙間指定
    Dim iMarginSlideEdge As Integer
    Dim iMarginImage As Integer
    Dim iMarginTotal As Integer

    '//[[[[[[[[[[[[[[[[]]]]]]]]]]]]]]]]
    '//[[ パラメータ指定 ]]
    '//[[[[[[[[[[[[[[[[]]]]]]]]]]]]]]]]'
    '//[[ 画像データの横に並べる数の指定 ]]
    iImageColumnCount = 3
    '//[[ 画像データ配置の隙間 ]]
    iMarginSlideEdge = 25
    iMarginImage = 5

    '//[[[[[[[[[[[[[[[[]]]]]]]]]]]]]]]]
    '//[[ 現在のスライドのサイズをポイントで取得 ]]
    '//[[[[[[[[[[[[[[[[]]]]]]]]]]]]]]]]
    iSlideWidth = ActivePresentation.PageSetup.SlideWidth
    iSlideHeight = ActivePresentation.PageSetup.SlideHeight
    '//[[ マージンの演算 ]]
    iMarginTotal = iMarginSlideEdge * 2 + iMarginImage * (iImageColumnCount - 1)

    '//[[[[[[[[[[[[[[[[]]]]]]]]]]]]]]]]
    '//[[ フォルダ選択 ]]
    '//[[[[[[[[[[[[[[[[]]]]]]]]]]]]]]]]
    szPath = SelectFolderInBrowser()

    ' フォルダ選択されていなければ終了
    If szPath = "" Then
        Exit Sub
    End If

    Set objFileSystem = CreateObject("Scripting.FileSystemObject")
    Set objFolder = objFileSystem.GetFolder(szPath)

    i = 0
    For Each objFile In objFolder.Files

        '//[[[[[[[[[[[[[[[[]]]]]]]]]]]]]]]]
        '//[[ 画像の挿入
        '//[[[[[[[[[[[[[[[[]]]]]]]]]]]]]]]]
        Set stImageShape = ActiveWindow.Selection.SlideRange.Shapes.AddPicture( _
            FileName:=objFile.Path, _
            LinkToFile:=msoFalse, _
            SaveWithDocument:=msoTrue, _
            Left:=0, _
            Top:=0)

        '//[[[[[[[[[[[[[[[[]]]]]]]]]]]]]]]]
        '//[[ 画像の縦横比の固定
        '//[[[[[[[[[[[[[[[[]]]]]]]]]]]]]]]]
        stImageShape.LockAspectRatio = msoTrue

        '//[[[[[[[[[[[[[[[[]]]]]]]]]]]]]]]]
        '//[[ 1枚目の画像から、画像サイズ計算(フォルダ内画像はすべて同じサイズとする)
        '//[[[[[[[[[[[[[[[[]]]]]]]]]]]]]]]]
        If i = 0 Then
            iImageWidth = Fix((iSlideWidth - iMarginTotal) / iImageColumnCount)
            stImageShape.Width = iImageWidth
            iImageHeight = stImageShape.Height
        End If

        '//[[[[[[[[[[[[[[[[]]]]]]]]]]]]]]]]
        '//[[ 画像サイズ・位置の指定    ]]
        '//[[[[[[[[[[[[[[[[]]]]]]]]]]]]]]]]
        stImageShape.Width = iImageWidth
        stImageShape.Height = iImageHeight
        stImageShape.Left = iMarginSlideEdge + Int(i Mod iImageColumnCount) * (iImageWidth + iMarginImage)
        stImageShape.Top = iMarginSlideEdge + Int(i / iImageColumnCount) * (iImageHeight + iMarginImage)

        '//[[[[[[[[[[[[[[[[]]]]]]]]]]]]]]]]
        '//[[ 画像が多い場合、スライドの追加 ]]
        '//[[[[[[[[[[[[[[[[]]]]]]]]]]]]]]]]
        If ((i + 1) Mod iImageColumnCount) = 0 And (stImageShape.Top + stImageShape.Height + iMarginImage + iImageHeight) > iSlideHeight Then
            ActivePresentation.Slides.Add( _
                Index:=ActivePresentation.Slides.Count + 1, _
                Layout:=ppLayoutBlank).Select
            i = 0
            ' スライド追加時にDoEvents(定期的にWindowsへ(ユーザーへ)制御を戻すため)
            DoEvents
        Else
            ' 10回に1度DoEvents(定期的にWindowsへ(ユーザーへ)制御を戻すため)
            i = i + 1
            If i Mod 10 = 0 Then
                DoEvents
            End If
        End If
    Next

    '//[[[[[[[[[[[[[[[[]]]]]]]]]]]]]]]]
    '//[[ 終了処理]]
    '//[[[[[[[[[[[[[[[[]]]]]]]]]]]]]]]]
    Set objFile = Nothing
    Set objFolder = Nothing
    Set objFileSystem = Nothing
    Set stImageShape = Nothing

End Sub

'//[[[[[[[[[[[[[[[[[[[[[[[[[[[[[[[[[[[[]]]]]]]]]]]]]]]]]]]]]]]]]]]]]]]]]]]]
'//[[ Function   : フォルダ選択ダイアログ                                       ]]
'//[[[[[[[[[[[[[[[[[[[[[[[[[[[[[[[[[[[[]]]]]]]]]]]]]]]]]]]]]]]]]]]]]]]]]]]]
Private Function SelectFolderInBrowser(Optional vRootFolder As Variant) As String
    '//[[[[[[[[[[[[[[[[]]]]]]]]]]]]]]]]
    '//[[ 変数定義                   ]]
    '//[[[[[[[[[[[[[[[[]]]]]]]]]]]]]]]]
    Dim objFolder As Object
    '//[[[[[[[[[[[[[[[[]]]]]]]]]]]]]]]]
    '//[[ フォルダ選択ダイアログ     ]]
    '//[[[[[[[[[[[[[[[[]]]]]]]]]]]]]]]]
    Set objFolder = CreateObject("Shell.Application").BrowseForFolder( _
                                 0, _
                                 "画像フォルダ選択", _
                                 &H211, _
                                 vRootFolder)

    '//[[[[[[[[[[[[[[[[]]]]]]]]]]]]]]]]
    '//[[ 選んだパスを取得     ]]
    '//[[[[[[[[[[[[[[[[]]]]]]]]]]]]]]]]
    If Not (objFolder Is Nothing) Then
        SelectFolderInBrowser = objFolder.Items.Item.Path
    Else
        SelectFolderInBrowser = ""
    End If
    Set objFolder = Nothing
End Function
ちょっと長いですが、コピペして使ってみてください。
※エラー処理等はあまりしていないので、ご注意。(責任は持てません。。)
使い方
画面を戻って、プレゼン作成ウインドウの『開発』タブから『マクロ』を選択します。
すると、さきほど作った関数がひとつ表示されます。
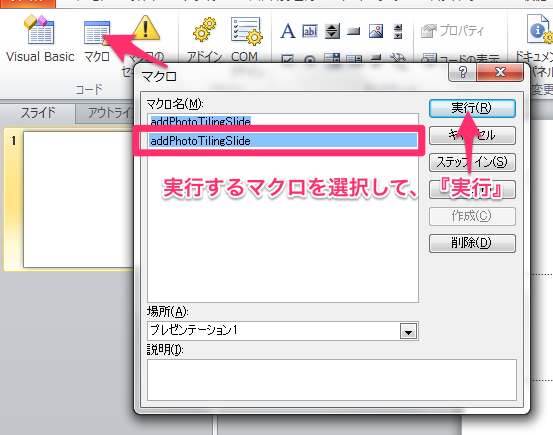
『実行』ボタンを押すと、フォルダ選択画面が出てくるので、画像の入っているフォルダを選んでください。

できた!美味しそうですね(謎
参考
VBA:フォルダを選択させるダイアログボックス - 513号室(保管庫) - Yahoo!ブログ
cl.pocari.org - PowerPoint のスライド毎に画像を貼り付けていくマクロ


